So I finally got into the whole NFT hype going on at the moment, I wanted to try out writing some Solidity code and doing the whole development process of creating something that lives on the blockchain.
I partnered with a visual designer friend of mine, she is a talented artist and I really liked the style of her work. So we decided to create an NFT collection of her Pigs and Pencils art work, the collection would consist of only 32 unique pieces that would be dropped through out the end of 2021 and 2022.
Now to the technical part
My tech stack consisted of the following;
- Open Zeppelin ERC721 base class
- Brownie, a solidity development framework
- IPFS to store the NFT asset and metadata
I followed the Test driven development (TDD) approach during development, this was the first time I had done this, the primary reason why was because my smart contract would be immutable (after deployment I can’t change anything) so there had to be zero bugs, the second reason is that the scope of what I was trying to do was clear (create 32 image NFTs) .
I started by setting up my development environment;
- Installing Brownie.
- Setting up my Python environment.
- Downloading the Open Zeppelin smart contracts.
Now that all of the setting up is complete, we go on to writing some code.
Code + Tests
My tests are split into 4 categories;
- Asserting text fields of my ERC721 token;
- Token name.
- Token symbol.
- Asserting how minting of a new NFT works;
- Maximum of 32 possible.
- Only the deploying address can mint a new NFT,
- When minting a new NFT, the target address for minting is then the owner for that NFT.
- Asserting how burning of an NFT works;
- Only the NFT owner can burn his own NFT.
- Asserting the tokenUri points to the correct asset;
- Each NFT has a unique tokenUri based on the NFT ID.
Now that we have an idea of what we want to test, the next step in the process is to write some test code and write our code for the smart contract. The goal in TDD is to first have some tests and then to write our smart contract code step by step to get our tests for pass, the process is a bit slow but it helps to already be thinking about tests and writing testable code from the beginning of the development process.
In Brownie (our Solidity development framework) we will write our tests using pytest (test framework for Python) it’s quite straight forward to use and there are plenty of resources online that show you how to write tests, so I’ll spare you the time and not include that part.
Our smart contract is written in the Solidity programming language that was created by computer scientist Dr. Gavin Wood (@gavofyork) interestingly enough that after he left the Ethereum foundation, he went on to start working on Polkadot, another smart contract blockchain that is even more advanced than Ethereum.
Our PigsAndPencils smart contract extends from the Open Zeppelin ERC721PresetMinterPauserAutoId.sol and Ownable.sol those classes give us many useful functions, specifically the auto increment ID that we will need for our tokenUri. So basically all we need to add is;
- Token name.
- Token symbol.
- Base Uri for our NFT metadata
- Maximum that can be minted.
We will pass those parameters in the constructor when we do our deployment, that way we can potentially reuse this exact contract if we want to deploy on testnets or even a totally different NFT collection.

Assets
Each of our unique 32 NFTs will have;
- An ID number which will be the number in the sequence of the 32 NFTs.
- An Image.
- Title.
- Description.
The question we ask ourselves is where do we want to have all of this data? A common misconception for NFTs is that all of that data is stored in the Ethereum blockchain and that’s what makes an NFT immutable. The truth is far from that, as an NFT developer there are a number of options to store that data;
- Amazon web services
- Digital ocean
- Azure
etc… the problem with those common choices is that by hosting your assets there they will not be immutable, some time in the future if you stop your subscription, you delete the folder or even modify the image file your NFT will be useless.
Enter IPFS and Piñata
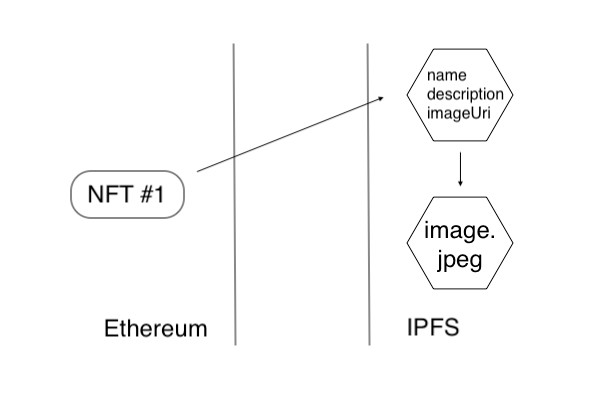
Piñata is basically a gateway to IPFS(Interplanetary File System) where we will have a folder with all our assets and our NFT tokenUri will point to the assets in this folder.
Each unique NFT has a tokenUri link that links to a .json text file, inside this file we have these fields;
- name
- description
- imageUri
These fields correspond to properties of our NFT, name and description is pretty straight forward they are just text representing the name and a description of the NFT. The imageUri is slightly more complicated as it is another link that links to the actual .jpeg of our NFT, in this way all of the content of our NFT is immutable and stored in a decentralised way.
The structure I used is as follows;
Deploying the smart contract
The final step in the process is to deploy the smart contract to the Ethereum blockchain, in Brownie this is a simple step, just run the deployment script with your Ethereum wallet address and private key. Once that has completed you can use Metamask and Etherscan to execute methods on your smart contract ie. function mint(address to) to mint your NFTs.
At the time when I was doing this, I waited until Sunday as it’s usually the day of the week when gas fees are the lowest and it’s more affordable for a regular non-whale Ethereum user to make transactions on the blockchain. It cost approximately $200 in ETH to deploy the smart contract and it would cost an additional $20 to $40 to mint each of the 32 NFTs, as you can see it’s really prohibitively expensive to use the Ethereum mainnet and why alternative layer 1 smart contract block chains and Ethereum layer 2 solutions have become incredibly popular over the last 1 year because of cheaper transaction costs.
Though the financial cost was quite high with this experiment, the knowledge gained through this experiment was really useful, so overall I think it was $300 well spent.
You can view the collection over at Opensea NFT marketplace
Thank you for reading! Hope this post gave you an insight into what happens behind the scenes with NFTs on Ethereum. ✌️